Ubuntu-Linux on
IBM Thinkpad X31
Outdated page: last updated on Sep 19th, 2005
 |
Preface
Note: This is NOT a guide, but just a brief report of a 2-night story during which I decided to give a chance of freedom and versatility to my laptop IBM Thinkpad X31. The Thinkpad comes without an internal CD drive, so I have used an external USB CD-drive. Then it came the choice of the Linux distribution to install. I have choosen Ubuntu-Linux (version: Breezy Badger) for the following reasons:
|
Summary
- Preparation & installation
- Post-installation activities
- Networking
- ThinkPad Buttons
- Modem
- GPRS/EDGE network connection with Nokia 6230 cellular phone
- Suspend to disk
- CompactFlash Card
- Feedback
Preparation & installation
If you decide to completely remove the pre-installed Windows XP, you don't need to prepare anything, just remove all the partitions during installation. If you opt for a dual-boot system, you need to make some room for Linux.
Such room can be found by:
- shrinking Windows partition with qtparted (running from a LiveCD, i.e. Knoppix);
- remove the IBM PreDesktop Area
To remove the PreDesktop Area (this was my choice), hit F1 soon after powering up to get to the BIOS. Here you can disable the "Predesktop Area", so that operating systems can now see the hidden partition.
Now we need to burn the installation CD. Download the ubuntu netinst iso image from Ubuntu download and burn it to a CD.
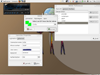
| The installation was very straight-forward. Concerning the wallpaper, I have googled around on Internet and downloaded this one, very clean. Click on the thumbnail to enlarge: |  |
Post-installation activities
- Root and CUPS
Soon after installation has finished, and changed the wallpaper, I let the user root come through:
and assigned it a password. This is because often I will need to be a real root, as in CUPS server manager. By the way, if you need to get access to the CUPS manager from its web interface (http://localhost:631) you need your root password, but you also need to add the cupsys user to this group:
and restart cups server:
- System Update
Now, from root edit your /etc/apt/sources.list file to remove the cdrom and add extra-repositories. This is mine:
deb http://archive.ubuntu.com/ubuntu/ breezy main restricted
deb-src http://archive.ubuntu.com/ubuntu/ breezy main restricted
deb http://archive.ubuntu.com/ubuntu/ breezy-updates main restricted
deb-src http://archive.ubuntu.com/ubuntu/ breezy-updates main restricted
deb http://archive.ubuntu.com/ubuntu/ breezy universe
deb-src http://archive.ubuntu.com/ubuntu/ breezy universe
deb http://security.ubuntu.com/ubuntu/ breezy-security main restricted
deb-src http://security.ubuntu.com/ubuntu/ breezy-security main restricted
deb http://archive.ubuntu.com/ubuntu/ breezy multiverse
After having modified the sources.list file, update the system:
sudo apt-get dist-upgrade
- FSTAB (Windows, CDROM)
If you have a dual boot system (Ubuntu+Windows XP) you need to edit /etc/fstab file to see your Windows NTFS partition. From root make a directory /media/windows then add this line to fstab:
I also had to modify other fstab entries. My external USB CDROM (the one from which I have booted installation) was reported under /dev/scd0 and didn't work after installation. I had to change the entry this way:
/dev/sr0 /media/cdrom0 udf,iso9660 ro,user,noauto 0 0
Networking
| The internal wireless card has been correctly detected during installation and the module ipw2100 loaded. Then, I have installed network-manager in order to have a nice auto-detection of wireless and/or cabled network (see screenshot): | 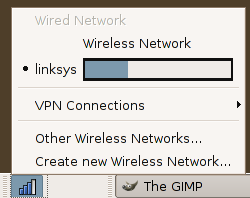 |
To run network-manager the first time, just type nm-applet into a terminal session. The nm-applet will be restarted if you save your gnome session on logout. Check that in [ System --> Preferences --> Sessions ]. You may also don't save your session and put nm-applet into the gnome StartUp Programs, with a priority of 90.
ThinkPad Buttons
The state of the ThinkPad specific buttons is reported through a non-volatile RAM chip. Ubuntu-Breezy linux-kernel has CONFIG_NVRAM enabled in the kernel , as far as ACPI module, so all main functions of Thinkpad specific buttons (volume up/down, mute, Thinklight on/off, etc...) are enabled thru the kernel. TPB is a little program that allows you to have a feedback On-Screen Display (OSD) for the Thinkpad buttons. First of all , you need to check if the module NVRAM is loaded. Type: lsmod | grep nvram to check. If not, you need to load NVRAM module. Type:
and just add at the end of the list the word nvram. Now check with lsmod if nvram module is loaded. If not, just type
At this point we need to add your user to the NVRAM users group. Type:
Now, let's get the program:
sudo gedit /etc/tpbrc
Uncomment and change the line starting with THINKPAD. You can put here whichever program you would like to start by pressing the "Access IBM" button. I use: THINKPAD /usr/bin/gnome-terminal.
Now we need to let tpb start at every system start. Just go to Computer->Desktop Preferences->Sessions and open the StartUp tab. Just add a new entry like this:
giving a priority of 99 (this will ensure that tpb will be the last program called during gnome startup) and restart the X31 ! You will have now OSD enabled for buttons like Volume Up/Down, Thinklight On/Off (Fn+PgUp) and Access IBM.
Modem
The internal modem in Thinkpad X31 is an AC97 Modem type:
0000:00:1f.6 Modem: Intel Corp. 82801DB/DBL/DBM (ICH4/ICH4-L/ICH4-M)
AC'97 Modem Controller (rev 03)
In order to get it working, you need to install the package sl-modem-daemon which is in ubuntu multiverse.
Once installed the package, your modem will be available on port /dev/ttySL0 ( or /dev/modem).
Now move to /etc/default and edit (with root privilegies) the file sl-modem-daemon. Browse to line SLMODEMD_COUNTRY= and type your country name (ITALY in my case...). Note: This last point is very important. I have been struggling for days before realizing that!
Now your modem is working. Just setup a dial script (with pppconfig or gkdial) and go online.
GPRS/EDGE network connection with Nokia 6230 cellular phone
DKU-2 seems to be a passive cable (unlike DKU-5). Nokia 6230 has a built-in USB-serial converter that's how the vendor and product IDs. Device is supported by usbserial module with generic serial support (CONFIG_USB_SERIAL_GENERIC=y) enabled, and this is how Ubuntu's kernelis configured.
Once connected the phone to the cable, and the cable to X31's usb port, check that the phone is listed in usb chain with lsusb command. Then install the module:
At this point phone is visible under /dev/ttyACM0. The possibles uses now are essentially 2:
- Manage the phone with an access software (gnokii);
- Use the phone to make a GPRS/EDGE network connection.
Case 1.
sudo gedit /<HOME>/.gnokiirc
Change following parameters in .gnokiirc file:
model = AT
connection = serial
With these settings the phone is correctly detected by gnokii and (almost)all functions are enabled. In order to have a full control over 6230 and allow gnokii to detect the DKU-2 cable, a kernel patch is needed. See this.
Case 2.
In order to configure a script for the GPRS connection, run sudo pppconfig and use the following pamaters (valid for Telecom Italia Mobile GPRS):
User: <your telephone number>
Password: <your password>
Speed: 115200
Com: /dev/ttyACM0
Method: PAP
Save the connection under the name "nokia". Now, to start the network connection, just run:
Suspend to disk
With Ubuntu, I finally got working suspend-to-disk. You need to edit the file /etc/default/acpi-support. Completely remove all the content from the file, and copy the following:
ACPI_SLEEP=true
ACPI_HIBERNATE=true
ACPI_SLEEP_MODE=mem
MODULES="e1000 ipw2100"
POST_VIDEO=true
HIBERNATE_MODE=platform
STOP_SERVICES="mysql apache2"
Now just reboot your X31, and you will have Fn+F12 full working.
CompactFlash Card Reader
As long as the module ide-cs is loaded (and in my Ubuntu installation it got loaded by default), you will find your CompactCard on /dev/hde1. First of all, make a dir named CF in the /media directory:
Then add an entry like the following line into /etc/fstab:
Now, each time you plug in a CompactFlash Card, your X31 will mount a disk in /media/CF.
Feedback
If you need more information, or if you simply need to contact me, my e-mail address is